Saturday, February 5, 2011

Soul Mates

I made my first felt, rolled rose today and it was so much easier that I thought. I watched a youtube video where the lady just drew her flower on cardstock and cut out. I ended up just cutting free hand. It was really fun! My rolled rose is for the challenge at Mark's Finest Papers-Speedy the Cat's Friends Challenge #41. The challenge is to use a self made flower on your card or project.

I'm using the colors from The Play Date Cafe challenge PDCC67. When I first saw the picture, I thought it was beautiful and then I couldn't imagine what I would do with those colors. But, in the end, I think I am pleased.


The Shabby Tea Room:Week #47-Get Creative  They ask you to make your own background (no patterned paper). And, make your own handmade embellishment (s). Mine is the rose I mentioned above.
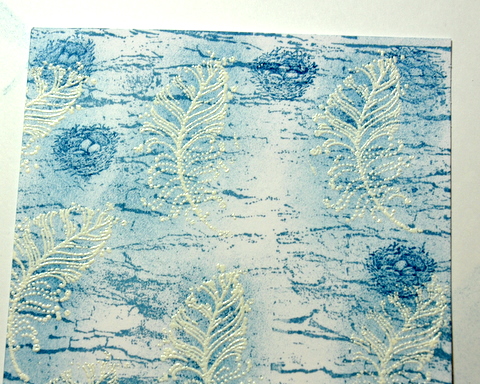
 For the background on my card, I started with a white piece of cardstock, then stamping with an All Night Media stamp (no name) that has little specks all over it. I used Stampin'Up! Night of Navy, Tim Holtz Distressed Stormy Sky, and Stampin'Up! Cherry Cobbler. The next step was to stamp an Inkadinkado stamp called Swirly onto the paper and clear emboss. I see most of that was covered by my bird image. After this was finished, I sponged over my paper with VersaMagic chalk ink-Pixie Dust.

Love this little  image I found in Jo Ann's for $1. I stamped in SU Night of Navy and clear embossed. I ran it through the Cuttlebug with a circle and circle, scalloped nestabilitie and sponged with Tim Holtz Distress Ink Stormy Sky while still in the nestie.

Add a ribbon and a punched corner and it's finished.

Recipe:
Stamps: Inkadinkado Swirly, Inkadinkado mini clear Spring Assortment, All Night Media (no name)
Paper: PTI white cardstock, Stampin'Up! Night of Navy.
Ink: Stampin'Up! Night of Navy and Cherry Cobbler, VersaMagic-Pixie Dust, Tim Holtz Distress Stormy Sky
Accessories: pink felt, craft glue, grosgrain dotted ribbon from LLS, clear embossing powder, EK Success corner punch

Friday, February 4, 2011

A Valentine for My Princess

I was in need of a card for my sweet 6 month old granddaughter. I know she will be so excited to get this card (funny) and I'm hoping it doesn't go straight to her mouth. LOL
I have cased a card on SCS for the QFTD challenge #46. The Queen is Susan aka One4Joy. She has the most unique and wonderful gallery of cards. This is the card I cased. You really should take a look through her gallery.

I think the card is fairly self-explanatory and the recipe is at the bottom of the post. My flower turned out more orange. It is, irl,  almost the same color as my peach colored paper. Ugh! I tried to get the color perfect, but it didn't work with the flower.

I'm entering these challenges:

Mark's Finest Papers-Speedy the Cat's Challenge #40-Valentine Card
Paper Sundaes #54- Valentines
City Crafter Challenge #42  CCCB#42 All You Need is Love Use the word 'love' or a heart or both
Simon Says Stamp-Love is in the Air-use hearts, flowers or anything else that reminds you of LOVE'

Recipe:
Stamps: Stampabilities-Princess Crown, Studiog for sentiment (no name)
Paper: Mark's Finest Papers: Premium Paper Craft Pack Grandma's Hope Chest (I call it peach), PTI white cardstock, Stampin'Up! Cherry Cobbler
Ink: Stampin'Up! Cherry Cobbler
Accessories: EK Success zig zag chain punch, Martha Stewart rhinestones, clear embossing powder, copics, trimmer with a wavy blade for the layer underneath the sentiment, Prima Lilliput Rose Tropocale

Wednesday, February 2, 2011

Embedded Image-Stampin' B's Design Team

This week, Vicky Gould gave the Stampin' B's Design Team challenge to do an embedded image. I had never tried this technique before. It was easy until I tried to emboss the image. That was only because of stray embossing powder. I was using red and it seemed to cling to my background no matter what I did. When I changed to brown, it did much better and left very little stray powder. I cannot tell you why.
The embedded image was a challenge recently on Splitcoaststampers. I did not do that challenge and didn't know what to expect but I think it turned out well. The instructions for this technique can be found on Holly McMillen's blog, Toy's Haven.

This is a summary of how to make the card:

Stamp a background image on light colored cardstock
Hold your VersaMark pad side down directly to paper. Go in one direction, turn
paper 90 degrees and go across again.
Apply a generous amount of clear embossing powder. Heat set.
Repeat steps 2 and 3. Repeat a third time. It makes a very shiny,
thick image.
Ink your silhouette image and stamp on clear embossed piece.
Apply darker embossing powder. Heat set. The image embeds
into the background. That is fun to watch.
Cut or die cut the image and make your card or project.

I'm entering my card into these challenges:
Speedy the Cat's Friends-Mark's Finest Papers-Valentine Card
Simon Says Stamp Challenge-Love is in the Air (creations with hearts, flowers, or anything that reminds you of love)
Penny's Paper-Crafty Challenge #46-Hearts a Flutter (let them see hearts)
TLC297-Splitcoaststampers-Embedded Image

Recipe:
Stamps: Mark's Finest Papers-Hearts, Hearts, Hearts (sentiment), Heart image has no name on stamp, All Night Media-Background stamp (no name)
Paper: PTI cream cardstock, Stampin'Up! Chocolate Chip, K&CO Smitten Pretties paper
Ink: Stampin'Up! Chocolate Chip
Accessories: crinkled brown ribbon, Flower by Daisy Doodles-candy pink, Spellbinders rectangle, scalloped nestabilitie

Making a Fun Background

Let me tell you, I had so much fun making this card.  A friend, Carol, at Chocolate, Crafts, and Bears, Oh My! had made a card and  used a tutorial from this blog,  StampARTic .  I decided to check it out. Wow! What a wonderful blog-online magazine for card makers. I started looking at all the tutorials and found this one for a background that I really wanted to try. It is easy and so much fun.

I got out a white piece of cardstock cut to the right size, stamped a distressed background stamp with Tim Holtz Distress Ink in Stormy Sky and then stamped my feather image with VersaMark Dazzle and covered with white embossing powder. After embossing, I sponged the cardstock with the same ink I had used with the distressed stamp. Then, I stamped the little nests from a Our Daily Bread Designs 'hand stamped just for you by' stamp.  It came with the 'You Will Find Refuge' stamp set. I inked ony the nest image for stamping.  My colors look a bit different on photo below....taken in a different light, but shows the layer before adding the next step.
After this layer was finished, I added my sentiment which is a stamp set from ODBD, Sing for Joy. I stamped it on a nestabilitie label and sponged around the sentiment with the same ink. My birds are waste from a border punch from EK Success called Birds and Holly.  O.K., the bad part--I then realized I had used other stamps than ODBD but wanted to enter the contest just the same. ( 2 ODBD & 2 others)

My card is for four challenges:
Our Daily Bread Designs-Blues Challenge (make the main color blue) ODBDSLC46
Stampin' Sister in Christ Challenges-#74 Psalm23-Use the colors blue(still waters) and green (green pastures) for predominate colors
Stamptacular Sunday#96 'Whateva' (be sure to use a stamp)
The ABC Challenge-N is for Nestie

Recipe:
Stamps: Our Daily Bread Designs-Sing for Joy & You Will Find Refuge, Stampendous-Feather Points, Stampabilities-Distressed Background
Paper: PTI white cardstock, Stampin'Up Night of Navy cardstock
Ink: Tim Holtz Distress Ink Stormy Sky
Accessories: blue grosgrain ribbon, Smooch Spritz on flowers, Stampin'Up! Dazzling Diamonds on flowers, QuicKutz-die cut (leaves), Quickie glue pin point roller, Spellbinders Label 4 nestabilitie, EK Sucess border punch -Birds and Holly (used only the waste parts), Prima flowers (spring mix)

Monday, January 31, 2011

Choo Choo Full of Love

I just had to make a Valentine for my sweet, little two year old grandson...actually I'll make a repeat for I have two that same age. They will get the same little train. They love the Polar Express movie so maybe they'll be excited to get this card.  I really had so much fun with this creation. I stamped the image three times and cut it out, then popped the top two trains. I really like the sweet, checked designer paper. The hearts are waste from a Fiskars graffiti heart punch. The sun is an adhesive button blossom and the train track is a Reminisce die cut sticker...Signature Series Trains.

I have been wanting to make some brads like the ones Carol from Our Little Inspirations makes for a lot of her cards. They are punched circles and then covered with glossy accents. How easy is that! Carol's always look so real (as in.. from the craft store). Plus, you can use paper to match the rest of your card. Also, they are easy for mailing. Of course, that won't help me any as I have three layers of the train and a thick train track to mail. So, the post office will get plenty for my card. Yikes!

My card fits several challenges:

QFTD45 on Splitcoaststampers. The Queen this week is Heather aka Isaiah40:31. I decided to case this card. I tried to keep the sketch and then added a sun and sentiment at the bottom.

Speedy the Cat's Friends challenge at Marks Finest Papers is to make a Valentine card. Just what I needed!

Paper Sundaes challenge #54 is Valentines

Stamptacular Sunday Challenge #96-Whateva-just be sure to use a stamp -My stamps are the train and my sentiment

Delightful Challenges-Have /a Heart (Put hearts on your project)

Recipe:
Stamps: Stampabilities-Cutesy Train, Stampabilities 'I Heart You'
Paper: PTI white cardstock, Green checked paper from scrapbook store-no name
Ink: StazOn jet black
Accessories: Fiskars graffiti heart border punch, Reminisce-Signature Series Trains-die cut sticker (track),
Sassafras adhesive button blossom (for sun)