Friday, February 4, 2011

A Valentine for My Princess

I was in need of a card for my sweet 6 month old granddaughter. I know she will be so excited to get this card (funny) and I'm hoping it doesn't go straight to her mouth. LOL
I have cased a card on SCS for the QFTD challenge #46. The Queen is Susan aka One4Joy. She has the most unique and wonderful gallery of cards. This is the card I cased. You really should take a look through her gallery.

I think the card is fairly self-explanatory and the recipe is at the bottom of the post. My flower turned out more orange. It is, irl,  almost the same color as my peach colored paper. Ugh! I tried to get the color perfect, but it didn't work with the flower.

I'm entering these challenges:

Mark's Finest Papers-Speedy the Cat's Challenge #40-Valentine Card
Paper Sundaes #54- Valentines
City Crafter Challenge #42  CCCB#42 All You Need is Love Use the word 'love' or a heart or both
Simon Says Stamp-Love is in the Air-use hearts, flowers or anything else that reminds you of LOVE'

Recipe:
Stamps: Stampabilities-Princess Crown, Studiog for sentiment (no name)
Paper: Mark's Finest Papers: Premium Paper Craft Pack Grandma's Hope Chest (I call it peach), PTI white cardstock, Stampin'Up! Cherry Cobbler
Ink: Stampin'Up! Cherry Cobbler
Accessories: EK Success zig zag chain punch, Martha Stewart rhinestones, clear embossing powder, copics, trimmer with a wavy blade for the layer underneath the sentiment, Prima Lilliput Rose Tropocale

Wednesday, February 2, 2011

Embedded Image-Stampin' B's Design Team

This week, Vicky Gould gave the Stampin' B's Design Team challenge to do an embedded image. I had never tried this technique before. It was easy until I tried to emboss the image. That was only because of stray embossing powder. I was using red and it seemed to cling to my background no matter what I did. When I changed to brown, it did much better and left very little stray powder. I cannot tell you why.
The embedded image was a challenge recently on Splitcoaststampers. I did not do that challenge and didn't know what to expect but I think it turned out well. The instructions for this technique can be found on Holly McMillen's blog, Toy's Haven.

This is a summary of how to make the card:

Stamp a background image on light colored cardstock
Hold your VersaMark pad side down directly to paper. Go in one direction, turn
paper 90 degrees and go across again.
Apply a generous amount of clear embossing powder. Heat set.
Repeat steps 2 and 3. Repeat a third time. It makes a very shiny,
thick image.
Ink your silhouette image and stamp on clear embossed piece.
Apply darker embossing powder. Heat set. The image embeds
into the background. That is fun to watch.
Cut or die cut the image and make your card or project.

I'm entering my card into these challenges:
Speedy the Cat's Friends-Mark's Finest Papers-Valentine Card
Simon Says Stamp Challenge-Love is in the Air (creations with hearts, flowers, or anything that reminds you of love)
Penny's Paper-Crafty Challenge #46-Hearts a Flutter (let them see hearts)
TLC297-Splitcoaststampers-Embedded Image

Recipe:
Stamps: Mark's Finest Papers-Hearts, Hearts, Hearts (sentiment), Heart image has no name on stamp, All Night Media-Background stamp (no name)
Paper: PTI cream cardstock, Stampin'Up! Chocolate Chip, K&CO Smitten Pretties paper
Ink: Stampin'Up! Chocolate Chip
Accessories: crinkled brown ribbon, Flower by Daisy Doodles-candy pink, Spellbinders rectangle, scalloped nestabilitie

Making a Fun Background

Let me tell you, I had so much fun making this card.  A friend, Carol, at Chocolate, Crafts, and Bears, Oh My! had made a card and  used a tutorial from this blog,  StampARTic .  I decided to check it out. Wow! What a wonderful blog-online magazine for card makers. I started looking at all the tutorials and found this one for a background that I really wanted to try. It is easy and so much fun.

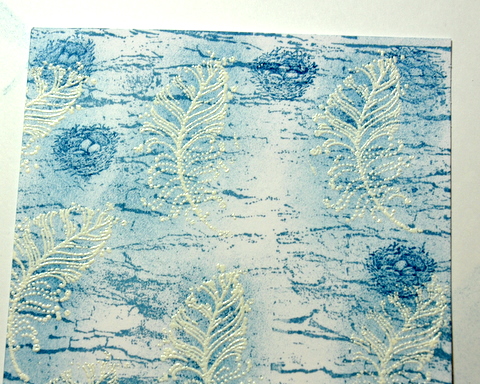
I got out a white piece of cardstock cut to the right size, stamped a distressed background stamp with Tim Holtz Distress Ink in Stormy Sky and then stamped my feather image with VersaMark Dazzle and covered with white embossing powder. After embossing, I sponged the cardstock with the same ink I had used with the distressed stamp. Then, I stamped the little nests from a Our Daily Bread Designs 'hand stamped just for you by' stamp.  It came with the 'You Will Find Refuge' stamp set. I inked ony the nest image for stamping.  My colors look a bit different on photo below....taken in a different light, but shows the layer before adding the next step.
After this layer was finished, I added my sentiment which is a stamp set from ODBD, Sing for Joy. I stamped it on a nestabilitie label and sponged around the sentiment with the same ink. My birds are waste from a border punch from EK Success called Birds and Holly.  O.K., the bad part--I then realized I had used other stamps than ODBD but wanted to enter the contest just the same. ( 2 ODBD & 2 others)

My card is for four challenges:
Our Daily Bread Designs-Blues Challenge (make the main color blue) ODBDSLC46
Stampin' Sister in Christ Challenges-#74 Psalm23-Use the colors blue(still waters) and green (green pastures) for predominate colors
Stamptacular Sunday#96 'Whateva' (be sure to use a stamp)
The ABC Challenge-N is for Nestie

Recipe:
Stamps: Our Daily Bread Designs-Sing for Joy & You Will Find Refuge, Stampendous-Feather Points, Stampabilities-Distressed Background
Paper: PTI white cardstock, Stampin'Up Night of Navy cardstock
Ink: Tim Holtz Distress Ink Stormy Sky
Accessories: blue grosgrain ribbon, Smooch Spritz on flowers, Stampin'Up! Dazzling Diamonds on flowers, QuicKutz-die cut (leaves), Quickie glue pin point roller, Spellbinders Label 4 nestabilitie, EK Sucess border punch -Birds and Holly (used only the waste parts), Prima flowers (spring mix)

Monday, January 31, 2011

Choo Choo Full of Love

I just had to make a Valentine for my sweet, little two year old grandson...actually I'll make a repeat for I have two that same age. They will get the same little train. They love the Polar Express movie so maybe they'll be excited to get this card.  I really had so much fun with this creation. I stamped the image three times and cut it out, then popped the top two trains. I really like the sweet, checked designer paper. The hearts are waste from a Fiskars graffiti heart punch. The sun is an adhesive button blossom and the train track is a Reminisce die cut sticker...Signature Series Trains.

I have been wanting to make some brads like the ones Carol from Our Little Inspirations makes for a lot of her cards. They are punched circles and then covered with glossy accents. How easy is that! Carol's always look so real (as in.. from the craft store). Plus, you can use paper to match the rest of your card. Also, they are easy for mailing. Of course, that won't help me any as I have three layers of the train and a thick train track to mail. So, the post office will get plenty for my card. Yikes!

My card fits several challenges:

QFTD45 on Splitcoaststampers. The Queen this week is Heather aka Isaiah40:31. I decided to case this card. I tried to keep the sketch and then added a sun and sentiment at the bottom.

Speedy the Cat's Friends challenge at Marks Finest Papers is to make a Valentine card. Just what I needed!

Paper Sundaes challenge #54 is Valentines

Stamptacular Sunday Challenge #96-Whateva-just be sure to use a stamp -My stamps are the train and my sentiment

Delightful Challenges-Have /a Heart (Put hearts on your project)

Recipe:
Stamps: Stampabilities-Cutesy Train, Stampabilities 'I Heart You'
Paper: PTI white cardstock, Green checked paper from scrapbook store-no name
Ink: StazOn jet black
Accessories: Fiskars graffiti heart border punch, Reminisce-Signature Series Trains-die cut sticker (track),
Sassafras adhesive button blossom (for sun)

Thursday, January 27, 2011

Swirls and Purples

The Play Date Cafe PDCC66 has a  color splash of  Lilac this week for their  challenge.  We are to use black and white a splash of lilac/purple. I love these colors...not something I use much but it is so pretty.
I want to thank the girls at The Play Date Cafe for choosing me as one of their runner up winners last week. I was very excited to get the 'Cream in our Coffee' badge.

I stamped this rather large image and cut around parts of it. It is layered on top of black cardstock and gray designer paper. Colored my flower with Copics of two colors of purple. My ribbon is black and white houndstooth. Glitter glue is added to the center of the flower and then a sentiment and that is all it needed.

My card is also entered into the following challenges:
Cutie Sunday #128-Everything is Permitted
Digi Doodle Shop's Best-Swirls
Sundays with Chrissy  #13-ribbons

Recipe:
Stamps: Stampendous - Floral Brocade, Mark's Finest Papers-Ladybugs and Carnations
Paper: black cardstock from Hobby Lobby, PTI whtie cardstock, Best Occasions Mixed Media Pack (dp)
Accessories: Houndstooth ribbon from Hobby Lobby, Gary M. Burlin & Co. purple glitter glue

Wednesday, January 26, 2011

Stampin B's Design Team Meets 'The Rose'

Want to hear some good music? It ties in with my card for the Stampin B's Design Team this week. I was inspired by this song, THE ROSE by Bette Midler.  In my opinion, this is
a beautiful love song.
This week, the Stampin B's have another fun challenge (#95) from NancyRuth to be inspired by a song title. I wanted to do Book of Love in the movie Shall we Dance (2004). Does everyone love that movie as much as I do?  Oh, that escalator/dept. store scene was so dreamy. But,  I didn't have what I needed to do that card so I moved on to Bette Midler's awesome song, THE ROSE. Love it just as much.

My card was cut with the Cricut. The image I used is Vintage Rose from Stampabilities. I did the ink marker to rubber, huffed and stamped. Filled in a bit of the image with copics. Then, I cut out another rose and popped it up after adding Stickles to the edges.
I used some unknown designer paper with musical notes behind the nestie and on the sentiment. The butterfly is vellum and edged with a gold leaf pen, then added a gemstone. The ribbon finished it off.

We hope you'll join this fun challenge here and be sure to include the song title in your description.
Use the Inklinz tool to upload your card on the Stampin B's blog or upload to the SCS gallery.

I am entering this card into a few more challenges:
Wee Memories challenge #40-Free Your Creativity-any creation goes
A Spoon Full of Sugar #136-Valentine Creations (yes, this is a valentine)
Craft Your Days Away CYDA Challenge #12-Represent love

Recipe:
Stamps: Mark's Finest Papers (sentiment) Hearts, Hearts, Hearts--Stampabilities-Vintage Rose
Paper: cardstock to cut card unknown, PTI white cardstock, designer paper unknown, vellum
Ink: StazOn Dove Gray
Accessories: Martha Stewart classic butterfly, Spellbinders Shapeabilities Fancy Tags, Spellbinders Rectangle nestabilitie, Star Dust Stickles, Krylon gold leafing pen, pop dots, Copics, Celebrate It ribbon, Cricut for cutting card, Stampin'Up! spiral punch

Monday, January 24, 2011

Vintage Sympathy

I really need some good excitement in my life so I could come here with good news and not have to talk about the dark, dreary, dank, and dismal weather we are having. Besides, I have a cold...so let's just move on. LOL Truly, life is good.
My supply of sympathy cards is always short so when I saw Speedy the Cat's Friends challenge #39, I was happy to see it was to make such a card. Thanks, Joanne.

Stampin'Sisters in Christ challenge #73 was given by Linda Lucas to do a vintage style card/project

Simon Says Stamp Challenge-Bingo-- What a fun challenge using the Bingo board shown below:
You are to choose three items in a straight line. It can be horizontal, diagonal, or vertical. I chose the lace, flowers, and embossing.

My card is using a flower from Mark's Finest Papers Apples and Camellia stamp set. I stamped twice, cut out, and glued the two together for some depth. I used a gold leafing pen to go around the edges.
The piece I embossed my sentiment on is a Spellbinders Pierceabilities die and I love it. I cut out the die, pierced, and sponged the heart while still in the die.
I added my lace, crinkled ribbon, a pearl and it is all finished.

Recipe:
Stamps: Mark's Finest Paper-Apples and Camellia, Stampendous-Encouraging Words
Paper: K&CO paper pad, PTI cream cardstock, Stampin'Up! Chocolate Chip
Ink: Memento Desert Sand
Accessories: Spellbinders Pierceabilities ric rac scalloped border, lace from Jo-Ann's, crinkled ribbon, Queen & Co. pearls, sponge, Krylon gold leafing pen

Friday, January 21, 2011

Butterflies and a Lot of Bling

My friend, Pam124, on Splitcoaststampers is Queen for the Day this week and she loves bling so I had to case this card of hers, one on which I had given her the leaves and butterflies to use on this card. I actually think of it as hardware. She is a riot and we have a lot of fun and craziness going on.
This card is also made to fit the challenge at The Play Date Cafe PDCC65 using these colors:
What a wonderful challenge with great colors.

I used a Martha Stewart dry embossing stencil and chalked the butterflies in tangerine. I cut out my green leaves with a Sizzix die cut, punched one green butterfly, added some punched tangerine chalked flowers, green and orange rhinestones were used, along with a crinkled, green ribbon. My grey designer paper is from ColorBok.

Simon Says Stamp has a fun challenge this week. Want to play some Bingo? 
You  choose 3 items that are in a straight line..and it can be horizontal, vertical, or diagonal. I chose Punch/Die Cuts-Flowers-Gems  

I want to enter my card into the challenge #2 at Stampin for the Weekend-Getting Warmed Up-your interpretation of the title. I feel warm just thinking how nice and warm/hot the weather will be when the beautiful butterflies are flying and flowers are blooming. Can't wait.

Recipe
Stamps-None
Paper: PTI white cardstock, ColorBok designer paper
Ink: ColorBox fluid chalk ink-tangerine, Memento Bamboo Leaves
Accessories: crimper, green and orange rhinestones, Martha Stewart classic butterfly punch, The Paper Studio flower punch, Sizzix branch/w leaves die cut, green crinkled ribbon, Martha Stewart dry embossing stencil, gel pen

Clean and Simple Valentine

O.K., it's time for a studio light. The weather has been so dreary here lately and I've had a bit of trouble
getting the photos I want. My hubby said he would make me a light tent or whatever I need. I am doing research.
Yes, we had a bit of snow last night and it looks as if the ground is covered. Not so much this time but we may have more next week. Maybe the sun will come out on Saturday. What a glorious day that would be.

I bought this little bird stamp recently and was about to die to use it. When I saw Little Red Wagon had
a challenge for a one layer wonder card, I knew it was my chance. I just sprinkled a few heart remnants from my heart border punch for the birdie to be pondering over (really knowing they are meant for him) and a sentiment, score line,  and ribbon and it's finished.
My card also fit Speedy the Cat's Friends challenge #38 at Mark's Finest Papers to use hearts.
I think my card also fits the CAS challenge #102 at Splitcoaststampers

Recipe:
Stamp: All Night Media - No name, Studiog for sentiment
Paper: PTI white cardstock, Stampin'Up! Cherry Cobbler
Ink: Stampin'Up! Cherry Cobbler, Memento Bahama Blue, Lady Bug, and Rhubarb Stalk
Accessories: Scor-Pal, twine from Mark's Finest Papers, Fiskars heart border punch (remnants)
        

Wednesday, January 19, 2011

StampinB #94 - Banner Challenge

Oh, I had so much fun with this challenge. Emily Keaton is the hostess of the Stampin B's Design Team challenge this week and she wanted us to include a banner of some kind on our card. Emily makes cards with the prettiest pennants and I've been wanting to try it for a while. I noticed on Emily's blog a bit back that she had found an easier way to make a pennant and that was with a diamond punch. Of course, I quickly put in an order for one because I couldn't find one in Hobby Lobby or Michael's. It came in time to make this fun card and I really had a blast with it. I just punched the diamond shape and folded it half. Next time, I think I will use paper that isn't quite so thick and they will make a neater fold.  I trimmed a couple of them down with my scissors just to make them smaller.

I do love the paper I used but have no idea what it is. I think I bought it at a scrapbook store or my sis may have given it to me from a pad.  It is so cheerful and I thought perfect for this card. The complete card..pennants and gifts are all matching papers. I stamped the image on my designer paper  and cut it out. I strung my pennants on twine and added a button with the same twine.

Hope you'll join us this week with your banner. Just post to the SCS gallery or from your blog using the inlinkz tool on the Stampin B's blog.

My card is also entered into this challenge"
Craft Your Passion #41 Button Up-real or faux

Recipe:
Stamps: Stampin'Up! Happy Moments
Paper-unknown designer paper, PTI white cardstock
Ink: StazOn jet black
Accessories: Fiskars diamond punch, red and white twine from Mark's Finest Papers, Spellbinders rectangle nestabilitie, button and rhinestone